Case-study focus: These two short on-site videos show a timber-frame drying layout built around a controlled “drying vortex”: air movers positioned in opposite corners and aimed tangentially, so their airflow travels around the room in one circulation loop. A commercial dehumidifier sits inside the drying zone to remove moisture released into the air.
Two on-site equipment-setup videos.
Circular cross-flow + commercial dehumidification.
Final readings, duration, repair scope or council outcome.
Watch the real timber-frame drying setup
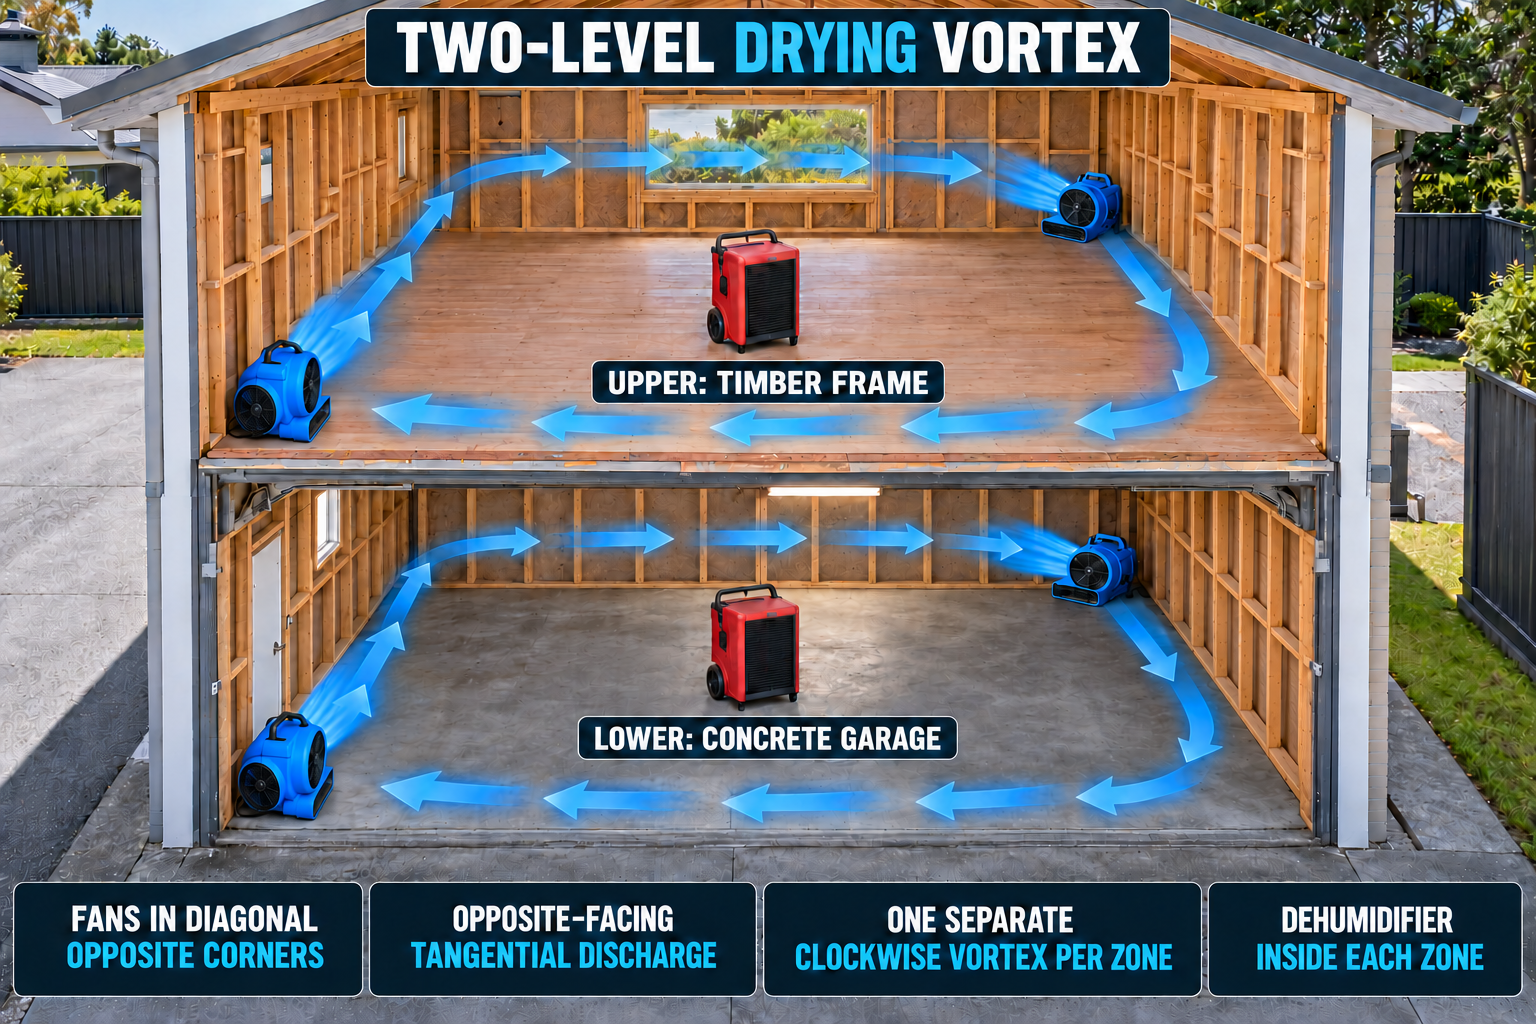
Two-level drying: upper timber frame and garage below
The brighter video view is the upper timber-frame level. The darker footage with the concrete floor is the garage below. Where both areas are affected, the useful concept is two independent drying zones—not one fan plan trying to serve both storeys.
Two separate circulation loops
- Upper level: two air movers sit tight in diagonal opposite corners, with their discharges facing in opposite tangential directions around the perimeter to circulate around accessible framing; the commercial dehumidifier stays inside the upper zone.
- Lower garage: its own two air movers sit tight in diagonal opposite corners and discharge in the opposite tangential directions to create a separate circulation loop over the concrete-floor zone; its dehumidifier also stays inside the garage zone.
- Floor separation: the intermediate floor is an interface to inspect and monitor. Air movement in one level is not proof that moisture in the other level is drying.
- Equipment placement: keep units clear of direct fan discharge, door pinch points, wet electrical hazards and drainage risks. Cable routing and safe power access must be checked on site.
- Monitoring: record a dry reference and comparable readings separately for upper framing, the floor interface and garage materials; do not combine readings from different materials as one result.
- Control strategy: avoid relying on wide-open doors between zones unless ventilation is part of the assessed plan. Uncontrolled exchange can make humidity and readings harder to interpret.
This graphic explains the intended setup only. It is not a measured record of this property’s moisture condition, equipment count, drying duration or outcome.
Related drying case studies and services
- Washing-machine leak: timber floor, stairs and garage drying case study
- Shower leak: hallway, bedroom, wardrobe, carpet and wall drying case study
- Timber-frame drying service · Flood restoration service · All Dry Me Now articles
What is a timber-frame drying vortex?
“Drying vortex” is a practical description for a room-scale circulation pattern, not a replacement for moisture assessment. Rather than aiming two fans directly at each other, each air mover is placed in an opposing corner and aimed along a room side. The goal is to keep air sweeping around accessible timber faces, wall plates and framing bays, reducing stagnant pockets. The dehumidifier is kept inside the controlled zone, safely clear of direct fan discharge, so it can remove the water vapour created by evaporation.
The intended airflow path
- Air mover A: starts the airflow along the first wall.
- Room-side sweep: airflow curves around framing instead of stopping at a single bay.
- Air mover B: reinforces the circulation from the opposite corner.
- Dehumidifier: reduces humidity in the enclosed zone so evaporation can continue.
- Moisture checks: determine whether the plan is working; surface feel alone does not.
Illustrative planning estimates — not property results
| Planning item | Illustrative estimate or starting point | What changes it |
|---|---|---|
| Equipment | Two air movers plus one commercial dehumidifier can be a starting layout for an accessible enclosed room. | Room geometry, timber exposure, moisture load, ventilation and safe power. |
| Hire cost | Dry Me Now’s listed commercial package starts at $75 + GST per day with a three-day minimum; the listed seven-day package is $400 + GST. | Final equipment count, duration, access and the drying scope. |
| Drying period | No defensible property-specific duration can be estimated from these videos alone. Plan for monitoring across multiple checks, not a fixed finish date. | Whether the water source is stopped, timber moisture, temperature, humidity and hidden materials. |
| Moisture monitoring | Take a baseline, select a suitable dry reference, then record comparable readings during the drying plan. | Meter type, timber species, material access and the reference condition. |
These are planning estimates and current published package prices, not an invoice, a dry standard, or a result for the filmed room. A site assessment confirms the actual setup and cost before booking.
Moisture-monitoring log to keep
| Check | Record | Why it matters |
|---|---|---|
| Initial setup | Water source status, affected framing zones, dry-reference location, equipment positions and photos. | Creates a defensible baseline. |
| Progress checks | Comparable moisture readings, room conditions, equipment operating status and any repositioning. | Shows whether the circulation pattern is improving conditions. |
| Before removal | Final comparable readings and any remaining suspect areas. | Prevents equipment being removed just because the timber feels dry. |
Council, consent and builder documentation — conditional pathways
This is not council advice and the footage does not establish whether this property needs consent, inspection, a discretionary exemption or any specific repair. Drying equipment itself is not a substitute for the building-work decision. If work moves from drying to repair, retain photos, moisture records, the source-of-water record, any builder or LBP advice, and the scope of proposed work.
- Drying and assessment only: keep the site record; no council outcome is assumed.
- Minor comparable repair: a consent exemption may be relevant in some circumstances, but must be checked against the actual scope.
- Structural framing, bracing, fire-safety systems, plumbing/drainage or durability failure: seek an Auckland Council/LBP assessment before repair work proceeds.
- When uncertain: use the official MBIE repair and replacement guidance and obtain site-specific advice.
Structural and mould-risk perspective
Exposed timber can appear dry while adjacent cavities, insulation, lower wall plates or concealed finishes remain damp. Persistent moisture can create musty odours and mould risk. If readings stall, if the source is still active, or if contamination, electrical exposure or hidden materials are involved, reassess the scope instead of simply adding more airflow.
What the videos do — and do not — show
The videos show an equipment-positioning concept for timber-frame drying. They do not show the original moisture condition, dry-reference readings, daily monitoring log, water category, structural condition, repair cost, time to dry, council decision or consent result. Those facts should be documented on the specific job.
Frequently asked questions
Should two air movers blow directly at each other?
Usually the more useful approach is to aim them tangentially so air travels around accessible materials. Placement still depends on the room shape and safe access.
Does the dehumidifier go outside the room?
For a controlled enclosed drying zone, the dehumidifier is generally positioned inside the zone, clear of direct fan discharge and with safe drainage and power arrangements.
Can this setup prove the timber is dry?
No. Only comparable moisture checks and an assessment of the affected materials can support a drying decision.
Does timber-frame repair need council consent?
It depends on the repair scope and building elements involved. Seek site-specific guidance before assuming an exemption or consent requirement.
Need an Auckland timber-frame drying plan?
Dry Me Now supplies commercial dehumidifiers, drying fans, moisture meters and delivery for suitable Auckland drying jobs. See the timber-frame drying service, or call 021 877 504 to discuss the wet materials, room layout and access before booking.
Recorded setup clips: airflow and dehumidification
These recorded Auckland clips show equipment placement and air movement around accessible timber framing. They document visible setup stages only; they do not establish moisture content, drying duration, final condition, cost or inspection outcome.
Keep real baseline and follow-up readings, dry-reference locations and equipment notes. See the pre-line timber-frame moisture checklist.