G’day, I’m Ernie. After years of crawling under Auckland bungalows and drying out flooded apartments, I’ve seen it all. When a leak happens, most folks mop the floor and think they’re sorted. But as a Licensed Building Practitioner, I know the real trouble hides where you can’t see it.
To properly dry wall cavities and underfloors, you need aggressive structural drying protocols involving industrial dehumidifier hire and specialized airflow. Trapped dampness causes internal rot; therefore, using professional moisture detection tools is the only way to verify your Auckland home is truly dry and safe from toxic mould growth.
Material Drying Requirements
| Material Type | Drying Priority | Typical Equipment Used | Difficulty |
| Timber Framing | High | LGR Dehumidifier + Air Movers | Moderate |
| Standard Gib | High | Targeted Air Injection | High |
| Concrete Slabs | Medium | High-Capacity Dehumidifier | Low/Slow |
| Plywood Subfloors | High | Underfloor Air Induction | Moderate |
Source: BRANZ – Drying Out a Damp House (2013)
🛠️ Why Hidden Moisture is an Auckland Home’s Silent Enemy
In my experience servicing Auckland homes, I’ve walked into houses that look perfect but smell like a wet dog. As an LBP, I’ve seen beautiful villas in Grey Lynn where the “dried” walls were actually rotting from the inside because the insulation was still holding water like a sponge.
Wall cavities are tight spaces with zero natural airflow. Once water gets in, it sits against your timber studs and bottom plates. If you don’t get that moisture out fast, you’re looking at structural failure and health issues for your family. -> Moisture moves from wet to dry -> It seeks equilibrium.
-
Mould can start growing within 24 -> 48 hours.
-
Wet insulation loses its thermal rating permanently.
-
Particle board floors can swell and require total replacement if left damp.
From a clinical microbiology perspective, some fungal spores remain dormant for years until the exact “water activity” level triggers a massive colony bloom.
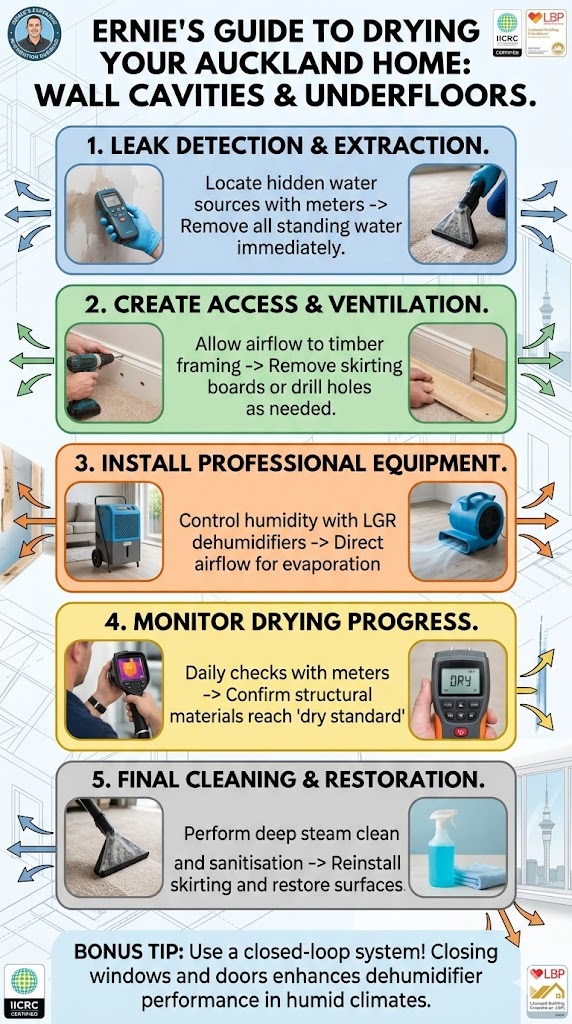
🌬️ The Step-by-Step Process for Cavity Drying
Drying the “bones” of a building requires more than just opening a window. You have to force the moisture out of the materials and into the air. We use a “top-down” or “in-place” drying method depending on the severity of the leak.
1. Access the Cavity:
We sometimes need to remove the skirting boards or drill small “breather holes” at the base of the Gib. This allows us to pump dry, warm air directly into the wall space.
2. Direct Airflow:
Standard fans just move air in circles. We use axial air movers that “sheet” air across surfaces to break the boundary layer of moisture. -> High velocity -> Rapid evaporation -> Faster results.
3. Control the Environment:
Once the water evaporates, it’s in the air. If you don’t have a commercial dehumidifier running, that moisture just soaks back into your ceiling yarns or textiles.
From an interior design standpoint, the aesthetic finish of a wall is often prioritized over its ability to “breathe,” leading to moisture traps behind vinyl wallpapers.
📉 Equipment Essentials: Beyond the Domestic Fan
A retail fan from a big-box store isn’t going to cut it for a flooded underfloor. You need the big guns. When we provide equipment hire in Auckland, we focus on LGR (Low Grain Refrigerant) dehumidifiers. These are designed to pull water out of the air even in the humid conditions we get here.
-
Moisture Meters: Essential for finding the “wet line” behind a wall.
-
Air Movers: These create the pressure needed to move air under floorboards.
-
HEPA Scrubbers: If mould is present, these clean the air while we work.
In our experience, trying to dry a subfloor with a domestic heater usually just creates a “greenhouse effect” that makes mould grow even faster. -> Heat + Moisture -> Rapid Mould Growth.
From an electrical engineering view, the increased load of running multiple industrial drying units can sometimes necessitate a temporary upgrade to the site’s circuit protection.
🧼 Restoration and Carpet Care Post-Flood
Once the structural drying is done, we focus on the textiles. As an IICRC-certified technician, I’ve seen many carpets saved by quick action. If the water was “Clean” (like a burst pipe), we can often dry the yarns in place and perform a deep steam clean and sanitisation.
If the water came from the ground or a sewage backup, the yarns and the underlay are usually a write-off. We prioritize your health over saving a bit of carpet. Once dry, we use professional-grade treatments to remove stains and odours, ensuring your home feels like home again.
From a chemical manufacturing perspective, the surfactants used in modern cleaners are designed to break the surface tension of water, allowing for deeper penetration into twisted yarns.
Key Takeaways for Auckland Homeowners:
-
Don’t wait: The first 24 hours are the most critical for preventing rot.
-
Measure, don’t guess: Use a moisture meter to confirm it’s dry.
-
Hire right: Industrial dehumidifiers are 10x more effective than domestic ones.
-
Safety first: If you see “black” mould, stop and call a professional.
FAQ
Q: Can I just leave the windows open to dry my floor?
A: In Auckland’s humid climate, the outside air is often as damp as the inside. You need a closed-loop system with a dehumidifier to actually remove the water.
Q: How long does structural drying take?
A: Usually between 3 -> 5 days, depending on the materials and how long the water was sitting there.
Topic Hub & Further Reading
This article is part of our definitive The Ultimate Guide to Emergency Flood Restoration in Auckland series.
More from this Hub:
- Step-by-Step Guide to Drying Out a Flooded Room After Heavy Rain
- How Long Does It Actually Take to Dry Wet Floor Coverings? -> An Auckland Pro’s Guide
- Why Waiting is Costly: The Hidden Dangers of Untreated Water Damage in Auckland
Need commercial extraction right away? Visit our Auckland Flood Restoration services page to book immediately.