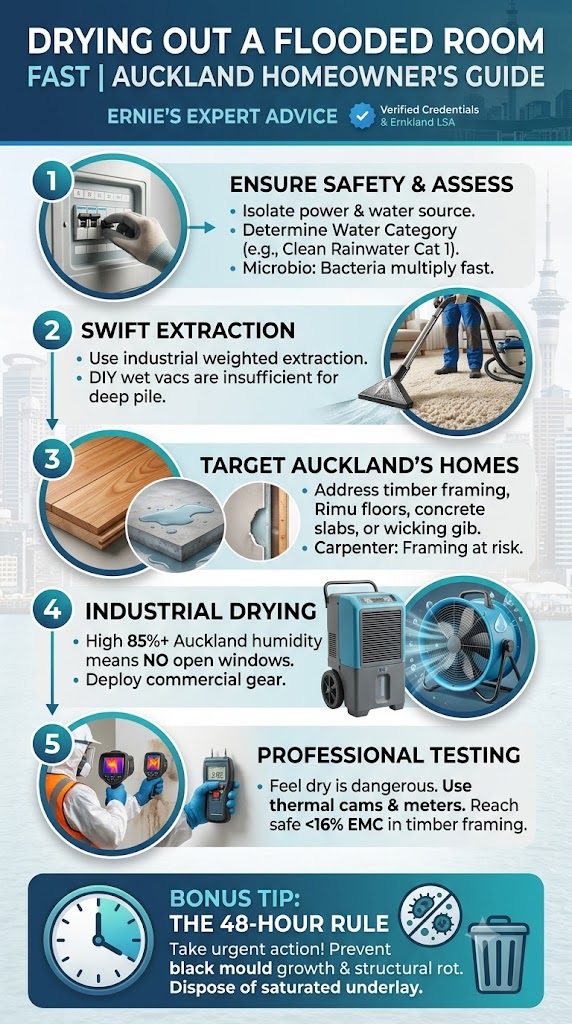
When intense sub-tropical rain breaches your home, acting within the first 48 hours is the definitive difference between a rapid, inexpensive dry-out and having to strip your walls back to the framing due to toxic mould and structural rot.
To safely dry a flooded room, immediately stop the water source and disconnect power. Next, prioritize rapid standing water extraction before removing the saturated carpet underlay. Finally, deploy commercial desiccant dehumidifiers and air movers to prevent irreversible structural timber damage.
Water Damage Categories & Required Auckland Interventions
| Category | Source Example | DIY Viability | Equipment Needed |
| 1: Clean | Rainwater leak, burst mains pipe | Yes (if caught <24h) | Extraction vac, LGR dehumidifier |
| 2: Grey | Washing machine overflow, fish tank | No (bacterial risk) | IICRC pros, anti-microbial treatments |
| 3: Black | Sewage backup, rising floodwaters | Strictly No (toxic) | Full strip-out, PPE, biocide protocols |
🛑 Step 1: Safety, Source Control, and Water Categorization
Before you start ripping up wet carpets, your first priority is safety. Isolate the water mains if a pipe burst, and safely disconnect the power to the affected rooms. Standing water and live electricity are a lethal combination.
Next, identify the water category. Clean rainwater is safe to manage initially, but surface floodwaters carrying street rubbish and sewage require immediate professional intervention.
If you are dealing with Category 3 black water, treating the space strictly as a hazardous bio-hazard is non-negotiable.
From a microbiological perspective, pathogenic bacteria double in population every 20 minutes when standing water remains at room temperature.
💧 Step 2: Rapid Standing Water Extraction
Relying on a domestic wet/dry vacuum to extract water from thick wool yarns is a losing battle. They lack the lift needed to pull moisture through the heavy pile and underlay.
Professional IICRC standards dictate the use of weighted water extraction wands. The operator stands on the wand, compressing the textiles to force trapped water up and out.
When we get called to a wet lounge in Mt Eden, my first instinct as an LBP isn’t looking at the carpet—it’s checking the moisture content of the timber bottom plate behind the skirting boards.
Thermodynamically, physically extracting liquid water is 500 times more energy-efficient than trying to transition that same moisture into a vapour state via evaporation.
🏠 Step 3: Navigating Auckland-Specific Housing Stock
Our local housing stock dictates exactly how moisture travels. A one-size-fits-all drying approach will fail if you do not understand what is sitting underneath your floor coverings.
1920s Ponsonby Villas (Timber & Sub-floors)
These heritage homes feature beautiful Rimu floorboards with a draughty sub-floor space. Saturated carpets here trap moisture against the timber.
Prolonged moisture exposure -> Rimu board cupping -> structural sub-floor rot.
1970s Brick-and-Tile Units (Concrete Slabs)
Homes built on concrete slabs act differently. The concrete acts as a massive sponge, becoming a cold moisture trap beneath your flooring. You must lift the textiles completely to dry the slab directly.
Monolithic Plaster Homes
Homes built with monolithic cladding often rely heavily on gib internals. Capillary action causes water to wick rapidly up these walls, turning a minor floor flood into a major wall cavity issue.
In structural carpentry, untreated damp in a closed wall cavity will compromise the load-bearing integrity of H1.2 pine framing within a matter of months.
🌪️ Step 4: The Physics of Drying in High Humidity
Auckland’s coastal salt-air and ambient humidity frequently sit around 85%. Simply throwing open a window to dry a damp room is completely useless. You are just replacing wet indoor air with wet outdoor air.
Effective drying requires a closed system. We deploy commercial air movers to strip moisture from the carpet threads, throwing it into the air.
Simultaneously, we use LGR (Low Grain Refrigerant) dehumidifiers to capture that airborne moisture and pump it down the drain.
According to the laws of thermodynamics, controlling vapour pressure differentials is the only way to force bound water out of dense hygroscopic materials.
🔬 Step 5: Professional Moisture Testing vs. “Feeling Dry”
A carpet might feel dry to the touch on top, but the underlay and concrete slab beneath can still be soaking wet. Relying on your hands is a dangerous game that leads straight to mould.
I recently had a client in Remuera try to dry their wool carpets with a domestic dehumidifier. As an IICRC textile expert, I knew the pile was ruined, but as a builder, I had to show them the rotting gib behind the skirting boards.
Our SiteWise accredited technicians use thermal imaging cameras and penetrating moisture meters to find hidden water pockets that the naked eye misses.
Achieving a stable Equilibrium Moisture Content (EMC) below 16% in timber framing is the strict carpentry threshold to prevent decay-causing fungi from taking root.
📋 Case Study: Saving a Ponsonby Villa from the Brink

Following a severe atmospheric rain event, a 1920s Ponsonby villa suffered rainwater ingress. A failed window flashing allowed water to saturate the wool carpet, pooling on the original Rimu floorboards in the lounge.
My visual check confirmed Category 1 clean water. Using a penetrating moisture meter, my LBP assessment revealed the moisture had bypassed the flooring. It was absorbing into the structural bottom plate of the timber framing.
The Rimu boards read at a dangerous 28% moisture content, creating a high risk for permanent cupping and warping.
Failed flashing -> saturated carpet pile -> Rimu timber absorption -> framing saturation.
We used weighted extraction wands to pull 90% of the water from the textiles. We lifted the edges to discard the ruined underlay and applied an anti-microbial treatment.
We then deployed two LGR dehumidifiers and three axial air movers to establish a vortex airflow, stripping moisture from the dense Rimu without damaging the heritage plaster.
Within 72 hours, the timber framing and Rimu floorboards were brought down to a stable 11% Equilibrium Moisture Content. The carpet was re-laid with fresh underlay, saving the homeowner roughly $18,000 in structural repairs.
From a carpentry standpoint, artificially lowering the ambient relative humidity safely accelerates the desorption of free water from the timber’s cellular structure without causing stress fractures.
❓ Frequently Asked Questions
How long does it take for a flooded room to dry out?
With commercial dehumidifiers and air movers, many standard residential rooms can reach an appropriate dry standard in roughly 3 to 5 days. The actual timeline depends on the amount of water, materials affected, indoor conditions and moisture readings; domestic equipment or open windows alone can take much longer.
Can you save carpet that has been flooded by heavy rain?
Sometimes. If the water is clean and extraction begins promptly, carpet may be recoverable. Underlay, contamination, odour, delamination or prolonged saturation can change that decision, so the carpet and underlay should be assessed before a drying plan is set.
Will a standard household dehumidifier dry out a flooded room?
A household unit can assist with a small damp space, but it is seldom enough for a flooded room. Commercial low-grain refrigerant dehumidifiers and air movers are designed to create the drying conditions needed for wet carpet, wall linings and framing; equipment selection should follow measured conditions and the affected area.
Microbiologically speaking, rapid drying within the first 48 hours is the only guaranteed mechanism to prevent dormant mould spores from germinating into active colonies.
🔑 Key Takeaways
-
The first 48-hour window is critical to prevent black mould and rot.
-
“Dry to the touch” on your flooring does not mean structurally dry underneath.
-
Heavy water saturation -> ruined underlay -> mandatory replacement.
-
Auckland’s high coastal humidity demands closed-system commercial dehumidification, not just opening doors.
In structural carpentry, surface-level cosmetics mean nothing; the true health of a home relies entirely on keeping the structural framing dry and properly ventilated.