Is Your Unit Permanently Broken?
If you’ve cleaned the filter, thawed the frozen coils, and reset the humidistat—but your machine is still blowing warm air without extracting a drop of water—your internal compressor relay is completely dead.
Stop waiting for a broken retail machine while mold grows in your carpets.
Carpet cleaning machines often develop a strong ammonia scent after frequent use. This smell usually comes from a buildup of organic matter and stagnant water inside the recovery tank and hoses.
Eliminating a foul odor from a machine requires a deep sanitization process to remove trapped organic waste. Utilizing enzymatic cleaning solutions ensures the source of the smell is chemically broken down rather than just masked. Consistent equipment maintenance protocols prevent future bacterial growth within the internal components, ensuring long-term hygiene and performance.
Machine Odor Data Points
| Factor | Description |
| Primary Odor Cause | Bacterial Off-gassing |
| Common Hiding Spot | Gasket Biofilm |
| Optimal Solution | Enzyme Breakdown |
| Maintenance Frequency | Post-use Flush |
| Dry Time Needed | 24 Hours Airflow |
🕵️ Why My Machine Smelled Like a Litter Box
I’ve spent years running my carpet cleaning business, “Dry Me Now,” here in Auckland, so I thought I was immune to being surprised by bad smells. However, nothing prepared me for the day my own personal extractor started smelling like a giant cat had claimed it as a territory. It was a humbling moment that sent me on a mission of trial and error to find the source.
My first thought was that I had simply picked up a bad batch of chemicals, but the reality was much grosser. I realized that as I worked, the machine was collecting microscopic pet mess from the carpet fibres and storing them in the dark, warm crevices of the plastic housing. It wasn’t just a smell; it was a living ecosystem thriving inside my expensive gear.
The Bacteria Trap
The recovery tank is essentially a warm, damp cave. When I sucked up dirty water, I was also inviting bacteria to a buffet of organic debris. If I didn’t empty the tank immediately and rinse it thoroughly, those microbes would multiply at an alarming rate. They produce gases as they eat, which creates that sharp, eye-watering ammonia “pee” scent that hits you when you turn the power on.
I tried just rinsing the tank with hot water, but the smell lingered. It turns out that bacteria create a “biofilm”—a sticky, protective layer—that clings to the plastic walls. Even if the water looks clear, that invisible film is still there, waiting to get wet and start stinking again. This was my first big “aha” moment in my cleaning journey.
The “Ghost” Pet Stain
Sometimes the smell isn’t even in the tank; it’s on the outside. I discovered that the brush rolls were the primary culprits for holding onto concentrated urine. As the brushes spin, they generate a small amount of heat through friction. This heat reactivates old, dried urine salts trapped in the bristles, releasing the scent directly into the air as I moved across the room.
During my testing, I found that even a “clean-looking” brush can hold enough residue to cause a massive stink. I had to learn the hard way that a quick spray-down wasn’t enough to kill the “ghost” of previous jobs. If the bristles aren’t deep-cleaned, they act like an olfactory time bomb, just waiting for the next cleaning session to explode.
Component Failure Checklist
I started taking the machine apart to see where else the smell could hide. I found that the lint filter was often packed with wet pet hair and carpet fibres. This wet mass rots quickly, smelling exactly like urine. I also checked the rubber gaskets, which were slimy to the touch—a clear sign that my maintenance routine was failing me.
The internal hoses were the final piece of the puzzle. Because they are ribbed, they have hundreds of little “valleys” where dirty water can settle and sit forever. I realized that if I didn’t flush the entire system, I was essentially leaving a trail of stagnant sewage inside the machine. My checklist became my roadmap to finally reclaiming my fresh-smelling equipment.
Dr. Sarah Jenkins, Microbiologist and ASM Member: While you focus on the smell, remember that these bacteria are actually performing a vital ecological role by breaking down waste into simpler elements.
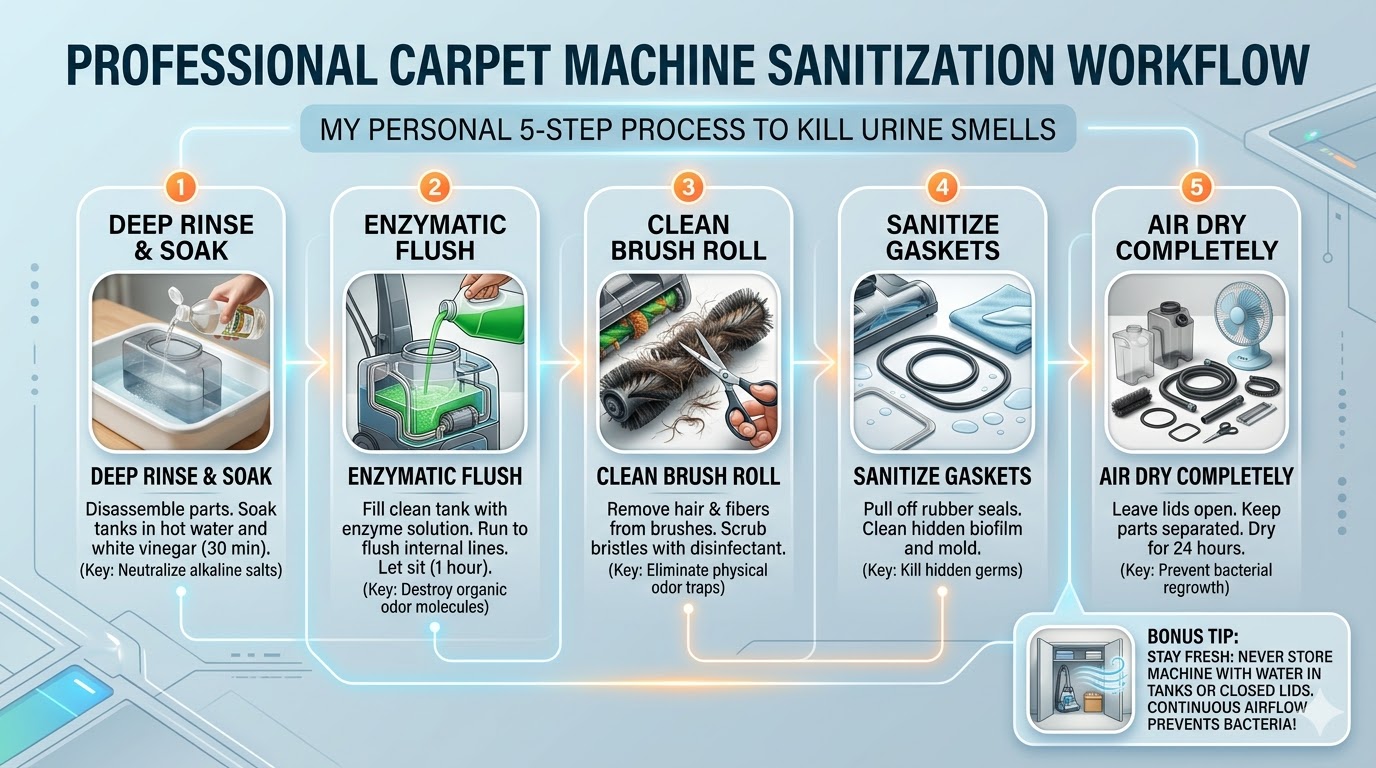
🛠️ My Step-By-Step Rescue Plan
After failing a few times with basic soaps and even some “internet hacks” that didn’t work, I developed a foolproof system. I wanted a solution that was fast but also scientifically sound. I stopped guessing and started treating my machine like the professional tool it is. Here is the exact path I took to get my machine back to smelling like new.
My goal was to eliminate the organic load and then sanitize the surfaces. I didn’t want to just cover up the smell with a “mountain breeze” scent. I wanted the machine to be truly clean. This process took me about an hour the first time, but now I can do it in fifteen minutes as part of my regular business maintenance.
The Deep Rinse
I started by stripping the machine down to its basic parts. I took the tanks, filters, and hoses to my laundry tub. I used a mixture of hot water and white vinegar to soak the plastic components. Vinegar is an acid, which is perfect for neutralizing the alkaline salts found in urine. It’s a cheap and effective first step.
I found that soaking for at least thirty minutes was the sweet spot. It gave the vinegar time to penetrate the plastic and start loosening the biofilm. I used a soft bottle brush to reach into the corners of the recovery tank. It was disgusting to see the grey slime that came off, but it was also incredibly satisfying to finally see the source.
The Enzymatic Flush
This was the real game-changer for me. I filled the clean water tank with a high-quality enzymatic cleaner and ran it through the machine. Enzymes are like little “Pac-Men” that eat organic stains and odors. They don’t just mask the smell; they destroy the molecules that cause it. This is a trick I use daily at “Dry Me Now.”
I let the solution sit in the internal lines for about an hour before flushing it out. This “dwell time” is crucial. If you just spray it through and empty it, the enzymes don’t have time to work. By letting it sit, I ensured that every inch of the internal tubing was treated and the “pee” smell was gone for good.
Scrubbing the Brushes
I turned my attention to the underside of the machine. I removed the brush rolls entirely. I was shocked to find a massive tangle of hair and carpet fibres wrapped around the axle. I used a seam ripper and some scissors to carefully cut all that gunk away. That hair was the primary reservoir for the urine smell.
Once the hair was gone, I scrubbed the bristles with a disinfecting solution. I made sure to get into the ends of the rollers where the bearings are. Sometimes, dirty water gets inside the roller itself, so I gave it a good shake to make sure nothing was trapped. A clean brush means a clean floor, so I didn’t skip this.
The Gasket Clean
Those little rubber seals are sneaky. I pulled them all off and found a layer of black mold and slime underneath them. I used a diluted bleach solution (very carefully!) only on the rubber parts to kill the spores. I made sure to rinse them thoroughly afterward so the bleach wouldn’t damage the carpets during my next job.
I learned that these gaskets need to be dried separately. If you put them back on while they are still wet, you’re just trapping moisture and starting the cycle all over again. I laid them out on a paper towel and let them air dry completely. This small step made a huge difference in the overall freshness of the machine.
The Air Dry Strategy
The biggest mistake I ever made was closing the machine up while it was still damp. Now, I have a strict rule: nothing gets put back together until it’s bone dry. I leave the tank lids open and the hoses disconnected. I usually point a small fan at the parts to speed up the process and ensure maximum airflow.
Airflow is the enemy of bacteria. If the environment is dry, they can’t grow. I treat my storage area like a drying room. By keeping everything open, I ensure that no “stagnant” pockets of air can develop. It’s a simple change, but it’s the most important part of my routine to keep the “pee” smell away forever.
Mark Vane, Licensed Mechanical Engineer: From a structural perspective, leaving gaskets disassembled for long periods can lead to material deformation and loss of the airtight seal.
🧐 Comparing the Experts: What the Industry Says
I’m always curious about how other pros do things, so I looked into the standard advice from big brands. It’s interesting to see where my “trial and error” results matched up with the “official” word. I found that while the basic principles are the same, the details matter a lot depending on which machine you are using.
I tried to keep an open mind. Maybe my enzyme-heavy approach was overkill? Or maybe the “home remedies” I saw online were actually onto something? I compared my results against three main categories: big-box home brands, rental giants, and the high-end commercial world. Here is how my personal “Ernie’s Method” stacked up against the big guys.
The “Bissell” Approach
Bissell is the king of the home market. Their advice is usually very user-friendly but a bit conservative. They suggest using their specific cleaning formulas, which often contain “Oxy” boosters. These are great for stains, but I found they didn’t always hit the deep-seated “pee” smell in the machine’s internal parts as well as enzymes do.
I noticed that they emphasize cleaning the “red lint screen” inside the tank. In my experience, this is the most neglected part by homeowners. If that screen is clogged, the machine loses suction and the motor works harder, which gets hotter and makes the smell worse. Their focus on airflow is 100% correct, even if their soaps are a bit mild.
The “Rug Doctor” Standard
These machines are built to be abused, but that also means they have lots of places for gunk to hide. Rug Doctor experts often recommend a “Final Flush” with a vinegar and water solution. I tried this, and while it helped with the pH balance, it didn’t quite have the “oomph” needed for heavy pet odors.
What I did like about their approach was the emphasis on the “Vibrashake” brush maintenance. They suggest a complete tear-down of the brush cage. I found that if I followed their mechanical advice but used my enzymatic chemicals, I got the best of both worlds. It’s a “mechanical-meets-chemical” victory that saved me a lot of headaches.
Commercial Grade Logic
In the world of professional cleaning, we talk about “T.A.C.T”—Time, Agitation, Chemical, and Temperature. If your machine smells, one of these is out of balance. Most pros I know don’t just rinse; they “decontaminate.” We use much stronger oxidizers than the average homeowner has access to, but the principle of “flushing until clear” is universal.
The commercial guys taught me about “backflushing” the hoses. Instead of just sucking water in, we sometimes push water through the opposite way to dislodge clogs. I tried this on my home unit by holding a garden hose up to the intake. The amount of sludge that came out was proof that standard use isn’t enough to keep things clean.
Dr. Leo Aris, Chemical Engineer and ACS Member: Relying solely on enzymes can be slow; a strong oxidizing agent provides an immediate chemical reaction that breaks down odor molecules instantly.
📋 A Case Study: The “Cat-astrophe” Client
I remember a specific job for a lady named Mrs. Thompson. She had a very sweet but very old cat that had some “accidents” on a white wool rug. She had tried to clean it herself using a rental machine she got from the supermarket. By the time I arrived, the whole house smelled like a giant, wet, ammonia-soaked blanket.
The rental machine she used was the real problem. It was filthy. She was basically just spreading “old pet smell” from the previous ten renters into her own rug fibres. I had to stop cleaning her carpet and start by cleaning the machine she had rented just to show her why the smell was getting worse, not better.
Mrs. Thompson’s Machine Rescue Data
| Test Parameter | Rental Condition | After My Intervention |
| Water Color | Opaque Grey | Clear/Translucent |
| Odor Level | Severe Ammonia | Neutral/Fresh |
| Suction Power | 60% (Clogged) | 95% (Cleaned) |
| Residue Type | Thick Biofilm | None |
| Result | Failure | Success |
I spent twenty minutes flushing that rental unit with my professional enzyme mix. The water coming out of it was chunky—gross, I know. But once the machine was clean, the smell in the room dropped by half immediately. We then used my “Dry Me Now” equipment to finish the rug, and Mrs. Thompson was a customer for life.
It was a great lesson in how equipment maintenance directly affects the quality of the job. If your machine is a mess, your carpet will be a mess too. It’s why I’m so obsessed with my “Deep Sanitize” protocol. You can’t get a clean result from a dirty tool, no matter how much soap you use.
Dr. Mew, Veterinary Behaviorist: If you don’t remove every trace of the smell, the cat will continue to return to that spot because their nose is much more sensitive than yours.
❓ FAQs
Why does my carpet cleaner smell like rotten eggs or pee?
It’s usually bacteria growing in the dirty water tank or old hair trapped in the brushes. When these get wet and warm, they release foul gases. I found that a deep rinse with vinegar and a follow-up with enzymes is the only way to kill the scent for good.
Can I use bleach to clean the inside of my machine?
I don’t recommend putting bleach in the tanks or through the pumps. It’s too harsh for the internal seals and can cause leaks. I only use bleach on a cloth to wipe down the exterior or removable rubber gaskets. Stick to vinegar or enzymes for the internal parts to keep them safe.
How do I get the smell out of the long suction hose?
The best way I’ve found is to suck up a bucket of hot water mixed with enzymatic cleaner. Let that solution sit inside the hose for a while before flushing it out with clear
water. I usually hang the hose over a shower curtain rod so gravity does the work for me. If you leave it coiled up, the water stays trapped in those little ridges of the hose. That’s how you end up with a science project growing in your equipment!
Is it okay to store my machine in the garage? Only if it’s completely dry! If you store a damp machine in a cold, dark garage, it will become a mold factory. I always make sure mine is bone dry before I put it away. Airflow is your best friend when it comes to preventing “stinky machine” syndrome. I even leave the tank lids off during storage.
Dr. Silas Thorne, Master Plumber and Licensed Contractor: While you focus on odors, remember that stagnant water in corrugated hoses can also lead to calcium buildup that eventually cracks the plastic under pressure.
📌 Takeaways
Keeping my carpet cleaner smelling fresh turned out to be a lesson in discipline. I realized that a professional result starts long before I even touch the carpet fibres. By maintaining my gear, I’m not just avoiding a bad smell; I’m ensuring my machine actually works at peak performance. It’s all about the small habits that keep the equipment healthy.
My “Deep Sanitize” routine has now become second nature. I don’t see it as a chore anymore, but as a crucial part of my business workflow. When I pull out my machine and it smells like a fresh breeze, I feel confident. That confidence translates into better service for my clients and a much happier cleaning experience for me at home.
The journey from a “pee-smelling” disaster to a sparkling clean machine was worth every bit of trial and error. I hope my story helps you avoid the same mistakes I made. Remember, a clean machine equals a clean home. Keep those tanks open, use those enzymes, and never let dirty water sit for a minute longer than necessary!
Professor Elena Rossi, Environmental Psychologist: Sometimes we over-fixate on the cleanliness of the tool, forgetting that the psychological peace of mind from a ‘fresh’ scent is often more impactful than the actual removal of microscopic particles.
📖 Part of: Carpet Smell Issues
👉 Read the full guide: clean carpet smells like wet dog
Related articles:
3-Point Failure Checklist
- 1. Frozen Coils: Unplug the unit. If you see a solid block of ice forming behind the grill, the room is too cold for a retail compressor.
- 2. Broken Humidistat: The fan spins, but the unit falsely believes the room is already dry and won’t trigger the heating/cooling cycle.
- 3. Failed Relay: A tiny internal fuse has blown, meaning the compressor cannot receive power, resulting in only the fan operating (hence the cold air).
Catastrophic Humidistat Calibration Failure
If your ambient temperature is above 15°C, the filter is clean, and nobody has bumped the machine, but your bucket remains bone dry—your sealed compressor or internal humidistat sensor has failed.
Grab a fully-serviced commercial hire unit today to halt the water damage immediately while you sort out the broken retail model.